Showing posts with label Male. Show all posts

Monday, 11 February 2013

Completed Fae Low Poly

So the last time I posted I had just started the fae model. Now it's finished!

It's been a bit of a rush, especially as the design has changed a few times throughout the development, but with help from the team I think we got a much more interesting design than we initially planned. Which is great!

Here is the low poly as it stands:


The planes around his head and shoulders as well as the legs will be vines or leaves coming off the body. I think the design is much more interesting to look at now than the original design, which is great as the player will be staring at this character quite a lot.

If I had more time and some more polys to play with I would have liked to have emphasised the vines and bark detail more, but this will hopefully come across much better in the high poly sculpt.

I have now passed this model on to the rigger, Joe Hornsby who will begin to rig it as I unwrap this model and make the high poly mesh. I will then hand him the new low poly which will be unwrapped once I have completed the high poly so he can skin that to the rig.

Sunday, 3 February 2013

Fae Time

With the success of the Centaur model I have immediately moved on to the Fae, the player character.

I don't think the design I have for the Fae is as strong as the Centaur was, so that starts me off at a disadvantage, and I have only 8 days to model the low poly, unwrap and then produce a high poly model so time is of the essence.

As of now I have 5 days left, a very scary thought, but it should be achievable.

Here is the low poly as of now...


Some major changes have been made since pre-production, the legs for example have been made into a much more animal like leg as opposed to the very sharp angles I originally had in mind. This was because when I started modelling it I found the design didn't work at all in 3D, so I had a discussion with the team and decided these legs would be best.

Another thing that's changed is the head, which I'm quite pleased with, the original horns we're a nice idea but I think this design works much better and should look good when it's all finished

That's all for now I'm afraid, I'll keep you posted on changes to the Fae and I will get round to writing some more tutorials and reviews on my other blogs once I get past this rushing stage of completing the characters, I already have some in mind I want to do.

Wednesday, 30 January 2013

Centaur Model Completed

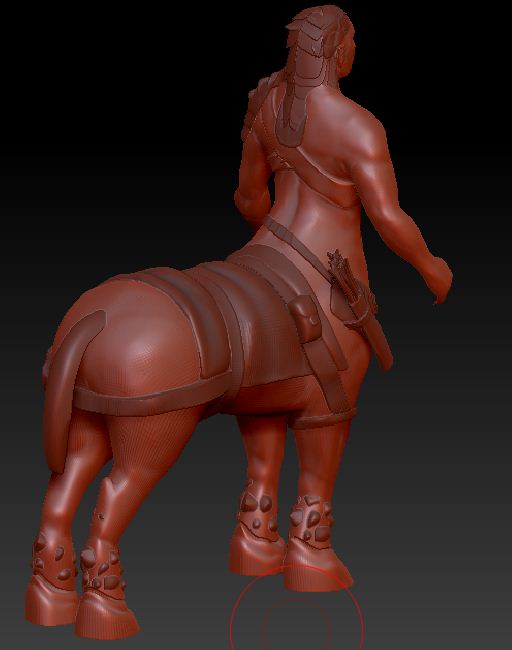
I have finished the low poly model and the high poly sculpt, yay!

I made a few changes to the low poly which included reworking the feet which I was never happy with, after some ideas from other members of the team we came up with a better way of doing it which involved more crystallised ice.

This pushed the poly count to 8000 which the art director said was good amount as the original poly count was 7500 but with some leeway as the centaur is more like two characters rolled into one.

I then took the centaur into zBrush, sculpted the high poly model, then turned it back to subdivision level 1 and imported it back into 3Ds Max to save some of the sculpted detail then with some small tweaks I had a finished low poly.

I just want to use this opportunity to say how much I love zBrush, I used to mock it for having such an unintuitive interface and horrible controls, but after spending a day getting into it then it begins to make sense, I cant wait until I can use it again.

Anyway, some images, here is the low poly:


Here is the high poly zBrush sculpt which I completed within a day, the same day I began learning zBrush (time is short people):


This is what the character looks like currently in Unity with the normal map applied from the high poly.


Some tweaks need to be made, I believe the normal map needs turning up a considerable amount in unity for instance, but this is what the model looks like when just imported and had the normal map slapped straight on it. The projects gone pretty well so far, lets hope I can keep it this way as I begin working on the player character model...

Saturday, 26 January 2013

Low Poly Centaur

I believe the low poly of the centaur is finished, tomorrow I will hand it over to the riggers and animators to give it a once over to look for any final changes that might need making such as edge loops.

There will not be any more major changes to the design and the topology will remain largely the same, after this I will be unwrapping it and creating a high poly model.

The model currently sits at 7,413 polys which is within the 7500 limit set.

Here some pictures of it:


I've rework some of the topology and redid the hair to make it tidier. There are still some tris that need cleaning up where I have meshed some of the pieces together but other than that it should be complete.


Wednesday, 23 January 2013

Enter the Centaur

Ok, so it's only been a few days since my last blog post, but I feel like I've done so much between then and now that it was worth another blog post.

I've still only been working on the Centaur due to the schedule and I have until Monday to get the low poly done, unwrap it and hopefully finish the high poly model for the normal map.

For now I am close to finishing the low poly, there are some changes left to do such as making the ice feet and the ice hand fade out from ice to skin in a more natural way and I need to get the hair working, which I will probably start again as it is getting quite messy...

But anyway, enjoy...


I have tried to keep the topology tidy and useful as well as keeping the polygon count fairly low as I have a limit of 7500 polys for the character 


The hair has been an interesting challenge for me as I have never done hair before, except on the Mongolian warrior I did last year which was just a block of hair, so it has been a great learning experience for me. Saying that I am going to redo the hair as I could make it a lot tidier and reduce the poly count by a considerable amount now that I know what I am going for.

The alpha maps for the hair was done using a technique in which I used the hair and fur modifier to render out an alpha channel of the hair. I was recently shown this technique and found it extremely useful so I will hopefully get round to writing a tutorial on how to do that over on my tutorial page.


Sunday, 20 January 2013

Final Year Project Is A Go!

So, the time has finally come, the final year major project production has begun. I'm so glad to be out of pre-prod and into production, I thought pre-prod turned out okay but I much prefer production as that's where my passions lies.

So the beginning of the production is pretty hectic for me as I have to get two characters and some props in to riggers and animators so they can begin their work. We've timetabled it all in around each other and if things go to plan it should work out perfectly but it does mean I have less time to tweak if anything doesn't go to plan. Still I'm hopeful for this and I'll be working pretty hard on getting these done in time.

The first two things I need to make are the characters, the Fae and the Centaur, as they need to be rigged and sent to the animators as quickly as possible so we can get the animations in game. As the Fae's rigger will be rigging the dragon first I am making the Centaur to begin with so that can be rigged straight away. Then I can hand the Fae over as the dragon has finished being rigged.

So there's the plan. I have until the 28th January to get the centaur modelled and hopefully unwrapped before I pass is on to get rigged, if it is not unwrapped within that time I can quickly unwrap it before it gets skinned.

Here is where the Centaur is so far:


It's far from finished, the head especially needs work, but I have been trying out a new workflow where I switch between 3Ds Max and Mudbox constantly throughout the modelling. I used 3Ds Max to get the shape right as well as smaller details and topology work and then switch to Mudbox to get the forms right and sculpt in details. This method has proved very useful so far so I'll keep using it for now.

I'm going to be working with the riggers and animators closely and taking all their feedback on board especially when it comes up topology but I have spent quite a bit of time so far in trying to get nice flowing edge loops and making sure it will deform correctly.

Things seem to be doing well so far, any luck and we might have a half decent game by the end of it.

Saturday, 3 November 2012

Specialist Animation Project Part 1 Complete

So it's been a little while since I updated my blog, this is due to the rush to get this first assignment in and then sort out a 10 minute presentation for the next day, so things have been a bit hectic. But it's over now, it turned out well and I get to have more of a laid back week now, which I could really do with. Well probably not...but it's nice none the less.

Anyway, enough babbling, time to show what I handed in for Spec Anim 1.

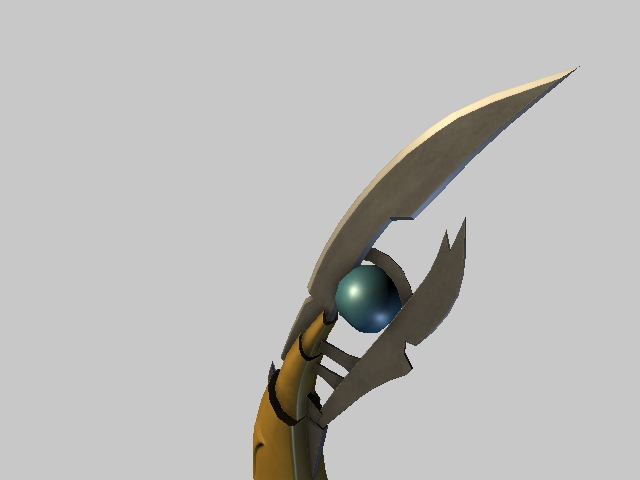
First off there was Mjolnir, Thor's hammer, and Loki's Sceptre. I already posted up the basically finished screenshots but now I have some with proper lighting as well as turnarounds so here goes.

Mjolnir, 379 Polys:


Loki's Sceptre, 655 Polys:


The image renders are quite low quality, I do apologise but these were screenshots as I went along rather than final renders. Hopefully the turnarounds will turn out better.

Overall I was quite pleased with the props, I think they came out at a decent quality even though I felt I could have improved on them quite a bit given more time, but I need to get into the workflow of producing things faster so this was a good practice for me and I'm happy with it.

After we had produced these we had to model and unwrap a a character that went along with the props, and I'm afraid this is where my work goes downhill. I would claim it was getting used to Maya or something, but I think it was my own fault, I rushed into the character way to fast without getting the basics down and this had a pretty bad effect on my model, I managed to improve some of it, but I fear the damage was already done.

In my haste I appear to have submitted the screenshots without making a backup for myself...smooth...but they were only basic renders anyway as we haven't textured the character yet, but I still have the turnaround so here you go.

Thor, 6813 Polys:


It's not all bad, I was quite pleased with how the face turned out, even if it doesn't look much like Chris Hemsworth (The actor who plays Thor in the Avengers and Thor movies) I still like how I managed to get a level of detail out of the face I haven't been able to previously. It's all learning and everyone has their bad pieces of work. No point in hiding them and pretending they didn't happen when you can learn from these moments.

Just to touch on the presentation as well. The feedback I got from the tutors seemed promising, especially as nerves usually get the better of me during presentations. I think I was pleased with the quality of work I had in the presentation so I didn't feel as nervous about presenting it. The presentation was to pitch the idea we have for the final year dissertation, mine was titled 'Aesthetics as Metaphor: A Study of Embedded Narrative' which is a study of environmental storytelling and how subtle background cues can influence how a play experiences and game and what emotions they can evoke.

If I feel confident enough I will post my dissertation on here for people to read, but I've never been a very strong writer so we'll have to see how it turns out.

Wednesday, 30 May 2012

Let the free time commence!

so yeah...I'm posting a lot less now that university is done for the year, I've been out enjoying myself with friends a lot and generally having a great time

In between the fun I've been trying to get a bit of work done, I've mostly been working with Mudbox as it is an amazing program that can produce some amazing pieces of work...but I'm not very good at it. It may be my lack of traditional art skills or maybe I just need to get used to all of the tools and tricks of Mudbox... but at the end of the day a bit of practice will help.

So first I took the basic human male mesh that comes with Mudbox and then tried sculpting onto that adding muscle definition using the Classic Human Anatomy by Valerie Winslow. I had some problems with getting the general form right, starting with the base mesh I found it more difficult to move the mesh around to get the shape right, for example I struggled with the shoulders and arms as I wanted to add a bit more muscle to them areas.

Never the less this took about an evening to do, I was quite pleased with some bits, others not so much, but it was still fun to make...


Another thing I decided to work on was a gun, something common in games which I still haven't gotten round to making since I moved over to art this year. I started making it in 3DS Max using a side on view of a M4 Commando and then took it into Mudbox to sculpt on to. The modelling took about an evening and the sculpting took around 3 hours. I set myself a poly limit of 1000 and it ended up being 1044 polys, so close enough...


I'm quite pleased with how it turned out in the end and proved to be very useful for improving my hard surface sculpting which I didn't really know how to do. After playing around with different techniques for about an hour I managed to find a way which worked for me so I stuck with that for the remainder of the project.

I intend to keep working on fast projects like this so that I can improve my work speed as well as practice lots of different techniques while I have the free time. Very soon I'll be beginning work on the 3rd year major project to get a good head start on that, so I will have some more complete works then.